Wednesday, July 31, 2013

Goals, Goals, Goals & Laminator Love!

Well....it's almost that time again....Back to School!  I was in my classroom yesterday for the first time to drop off some books and to put up a few bulletin boards. I start teaching summer school in two weeks and then we are officially back on the 27th. 

I have to admit...I am looking forward to it!  Not that I don't enjoy my lazy days of summer, I do!  But I am ready for a change.  Besides, the weather in Wisconsin has been very chilly for the past week and it doesn't look like we will get out of the 70's for awhile so I think even Mother Nature is ready to go!

With that in mind, I am linking up with Jess at I {heart} Recess for her monthly goals linky party.  This month's theme...Back to School!
Personal:  Spend more time writing
A part of participating in the National Writing Project at UW-Milwaukee was that we wrote EVERY day.  What I discovered is that I love to write and it could become a new hobby for me.  I have always loved writing, but just didn't do it on a regular basis.  Now, I will be more committed to carving out time every day to write.

Organization:  Put it away
Hello, my name is Jennifer and I'm a piler, not a filer.....OK, now that I've admitted it, I can face my piling addiction and start getting a handle on it.  I make great piles -- and I know where everything is in that pile -- but I want to start to de-clutter my life and that begins with getting rid of piles. 

Planning:  Write it down
I have told myself "I'll remember that for next year, I don't need to write it down" on so many occasions, I can't count them!  Truth is, I don't remember...and now some great ideas that I had last year are probably gone.  :(  This year, I will be more committed to keeping track of my ideas and plans so I can stop this cycle of forgetfulness.

Professional:  Learn more about Mentor Texts & Writing Circles
My research project for the UWM-WP was about using mentor texts to REVISE writing.  (If you want to read more about it, you can read about it here and here.)I will present my research again at a conference in November so I need to keep learning more about them.  Also, as a result of my friend Kelly's research at the UWM-WP, I have a new-found obsession with Writing Circles.  I am reading the book right now by Jim Vopat and there is a possibility that I may get to meet him and work with him on some action research so I want to learn as much as I can!
Product Details
Students:  Create a community
Creating community is so important to do at the beginning of the year!  I want for us (this includes my students) to create a classroom where every student is valued and feels safe to share their ideas and take chances to grow.

Motto:  They don't care how much you know, until they know how much you care!
This motto is compliments of my Classroom Management professor, Dr. Corey Thompson.  It's pretty self-explanatory and goes back to a sense of community and respect.

Make sure you head on over to I {heart} Recess to share your own Back to School goals!

I'm also linking up for the first time with Covered in Glitter and Glue for What I'm Loving Wednesday.
Like many of you, I have fallen in love with my laminator.  I bought it last year and am so glad I did!  It is really nice to have so many of those small projects done before going back, instead of having to stand in line for the laminator.  As a matter of fact, this little guy will be getting a lot of use today as I laminate my new Number of the Day task cards that I just designed and put up for sale on my TpT store.  I will blog more about those tomorrow so check back!


And since this is Wednesday and I haven't linked up with Teach N' Tex for PMA Wednesdays in awhile, I want to throw this one out there because I think it fits in perfectly with goal setting as we head back to school.
Source:  http://www.debsphotographs.com/photoblog/2011/04/crossfit-update-eight-months/
So here's to hoping that we will all "find a way" to meet our goals this year.  May this be your best year yet!

Monday, July 29, 2013

Monday Made It {July 29, 2013}

My daughter says I have gone into crafting overdrive...That's probably true considering I have been busy with the National Writing Project for the past three weeks.  (She has even started calling my office/craft room the "Mom Cave"-- Love it!!) I was excited to get back to it this weekend and to catch up on making some of those great ideas I found out in blog land.

Just in time to link up with Tara at 4th Grade Frolics for Monday Made It!  YAY!!
 
Project #1:  Dry Erase "Erasers"
Tired of students never having an eraser for their dry erase marker?  Hot glue pompoms on the end and they'll never be without an eraser again!  I've seen this idea all over Pinterest so I don't know who to give the original credit to, but I thank you for your creativity!
 Project #2:  Cute Corner Bookmarks


So cute and SO EASY!  Found this idea on Pinterest and tracked down the original website here.  I am thinking about making one for each of my students for their first day goody bag.
 
Project #3:  Clothespin Magnets  

 
Found these beauties in the dollar bin at Michael's and they hopped right into my cart!  I glued some magnet strips on the back of a few and on a few others, I hot glued a tack to use as a push pin.
 Project #5:  Behavior Beads from Run! Miss Nelson's Got the Camera.
I bought these the very first day I saw them because I love the idea of brag tags. She has so many fun varieties! I found some chain necklaces at Hobby Lobby and went to work with my laminator.  This week, I have worked on cutting the sheets apart and putting them in a storage case.
 Kara helped me cut the necklace chains...
Some words of advice if you take on this project...
1.  Print them on WHITE cardstock, not colored cardstock.  Look at the difference it makes...The first guy looks normal, the second looks sunburned, the third looks ill and the fourth looks sad.  I am going to get some more white cardstock for the rest I need to print.
2. To make hole punching them easier, cut the page into three strips, hole punch with a tiny hole puncher, then cut into individual cards.
3.  To store them, I would rubber band them into groups.  It makes it easier to get them out of the case and let's say you get a visit from your Puggle who overturns the whole case because she's trying to convince you that you need to go feed her, you won't be separating them again.  I'm just saying it could happen...

Project #6:  Chair Book Pockets
In addition to being a Monday Made It project, this next project is an organizational tool, which qualifies me to link up with Optimum Organization with Fun in Room 4B and Ladybug's Teacher Files.  (I just made this linky party at the last minute...this is their last week!  :)
I grew tired of my students shoving their (my) paperback books into their desk and ruining the covers.  Also, whenever we moved desks or brought our chairs to group work, the students always had trouble making sure they got THEIR chair back.  So I came up with this plan....

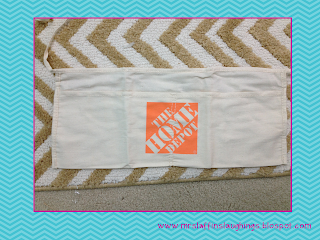
Buy some Home Depot fabric tool belts for 77 cents each.
 I made some student numbers to print and glue onto cardstock.  The Home Depot logo is about 4 inches square, but I picked orange cardstock in case I didn't cut it exact.  (I'm a little OCD with that...)
Talk your daughter into laminating them since she's sitting around waiting for you to take her to the horse farm anyways.... 
 Hot glue (lots of glue!!) to cover the Home Depot logo.
 Attach to the back of your students' chairs.  (You can see that it even works on my kitchen table chair!)
I have made the numbers available in my TPT store to save you the trouble of making your own numbers if you'd like to do this too!  However, if you pin this project and leave me the URL of your pin, I can send you the numbers for FREE!  It's a win-win!!  (Just make sure you are not a "no reply blogger.  Not sure?  Visit Ideas by Jivey for a tutorial to find out.)

Can't wait to see what everyone else has done this week!

Sunday, July 28, 2013

The 12 Days of Fitness & Looking Ahead

Can it really be Sunday already???

I have read from several other bloggers that they go back to work tomorrow.  It's hard to believe that the summer has flown so quickly.  I don't go back until August 27th (the kids start the day after Labor Day) but we don't get out until June 11th next year so it all balances out in the end. 

My National Writing Project experience at UW-Milwaukee is over.  It was a GREAT time and I learned SO much.  I am looking forward to getting back into my classroom, school, and district to share some of the great things that I have learned.  (If you want to read about any of them, you can search by the "Labels" section to the right.)

So now that I can focus on something other than that, I am excited to link up with two great bloggers today for their linky parties.

First, the fabulous Joanne at Head Over Heels for Teaching.  I absolutely LOVE Joanne...she is absolutely hilarious and always has such great ideas on her blog. Not to mention, she shares my love for Post-Its.  I hope you will check it out!

We all know how important it is to have brain breaks in the classroom.  Sometimes, kids just need to get a little oxygen to their brains to keep that thinking moving.  That's where the Twelve Days of Fitness comes in!
Credits: 
Paper:  I Teach What's Your Superpower?
Font:  Hello Fonts by Jen Jones
Clip Art:  Jeanette Baker of Jason's Online Classroom
This active song, sung to the tune of "The Twelve Days of Christmas" is a great way to get kids moving in a very short amount of time and the students LOVE it!

You start off by singing, "On the first day of fitness, my teacher gave to me, one stork stand" and the students stand on one leg like a stork.  Then "On the second day of fitness, my teacher gave to me, two scissor kicks and a stoooorrrrrk stand" and act out both movements.  The song continues until all of the 12 days are finished....or you can roll dice to see how many days you will sing that time if you don't have time for all 12 days.

I wish I could take credit for this great idea, but it belongs to the California Department of Public Health and their Power Up for Learning campaign.  They have so many great ideas in this PDF about how to get students moving!  I hope you will check it out!

I also want to link up with Latoya at Flying into First for her Let's Get Acquainted linky.
This week's topic:
Upcoming School Year Goals
 
I have to admit, I am an overachiever when it comes to setting goals so I am going to try to limit myself to goals that I feel are really important to me this year (and not just "nice to try for").

1.   Incorporate the great ideas that I learned from the UWM-WP this summer.  So many great ways to get kids writing!  Specifically, I will focus on collaboration in writing and e-portfolios.

2. Share those great ideas with my colleagues to help them become better teachers of writing.  I am heading up my district's writing committee so this will be a great opportunity to share!

3.  Incorporate my technology into my classroom and instruction.

I think three is a good number, don't you?  I am going to focus really hard on these three things to make them happen! 

For those of you returning to work tomorrow, I wish you well!  May this be your best year ever! 

See you tomorrow for Monday Made-It with 4th Grade Frolics!

Thursday, July 25, 2013

My Boys are Back! & National Writing Project Days 13 & 14: Collaborative Writing

I'm sooooo excited that my husband and son have returned from the Boy Scout Jamboree!  They got home early this morning around 1:00AM.  Let me just say, they both took a hot shower before going to bed because they haven't had hot water for almost two weeks!

As I blogged last week, my son broke his ankle on his first full day at the Jamboree.  :(  Despite being on crutches, he still had a great time!  The doctors at the Jamboree removed his cast and gave him a temporary cast because his hard cast had gotten too wet from all the rain.  Here is a picture that his scout leader took as they were packing up to come home....that is muddy water his leader is standing in!
I'm glad to report that a broken ankle didn't stop Ryan from participating in one of the most frenzied activities at Jamboree....patch trading!  This is seriously crazy and I don't understand why.
 
The way it works is that each council designs a patch set to represent their district.  My son's district was from Milwaukee so their patch set was sponsored by Harley-Davidson.  Throughout the Jamboree, the boys walk around and trade their patches for others.  Some of them are very cool!  Here's a look:


Ryan put together a binder of all of his patches...thank goodness I don't have to sew them on!

Now on to the writing portion of this program...  :)

Today at the UWM-WP, Shannon had a wonderful presentation about collaborative writing.  This really got me thinking...Writing is usually a solitary act between the writer and his or her pencil.  But we all know how collaboration can bring about great results and Shannon shared some great activity ideas:

1.  Add a Line:  Give students a stem such as "Johnny knew his trip to the canyon would be risky, but he didn't know.....".  Each student in a group gets a different stem.  They finish the stem and then pass it to their right.  The next person adds to the story, passes, and repeat until the stem has been all the way around the group.  Then the original person can choose to take the collaborative story and revise it or keep adding to it.  It is important that if you do this activity, you carefully model for students how to add a line and that first, they must reread the whole story before adding their line.
 
2.  Content Area Add a Line:  Just like above, but give a stem for something you are studying in a content area such as "The digestive system is one of the most important systems in the human body because...".  This time, students each add a supporting detail to the stem to show what they've learned.  The key here is that there are no repeating details allowed.

3.  Mr. Potato Head:  On a poster board, draw a stick figure (or a Mr. Potato shape).  Each team member is given a different color Post-It pack.  In five minutes, students brainstorm character traits for this stick person and add it to the poster board.  When time is called, the group uses the collaborative character traits to each write their own story.  So the main character will be almost the same for everyone, but the story line will be different. (The different colored Post-Its are to hold each student accountable for adding to the brainstorm and not letting others do all the work.)

4.  Dialogue First:  Partners each write a dialogue on Post-Its for two characters.  They then use the established dialogue to write a story.

Collaborative writing experiences can also occur in a Writing Circle format (see my post about Writing Circles from Monday here) and in the feedback/revising stage of writing.  I think it is a great idea for students to support each other as writers!

Tomorrow is my last day at the UW Milwaukee Writing Project.  I will be so sad to see it end, but I am so excited to take back what I've learned to my classroom, school and district!  Thank you for following me in this journey.  I hope you have learned some new tips for teaching writing!

Tuesday, July 23, 2013

National Writing Project Day #12: "I Wonder" Writing & Teaching Voice

As expected, I had another wonderful day at the UWM-WP!  I love that every day, I take at least one idea away that I can use in my classroom.  Today, I have TWO ideas to share!

First, "I Wonder" writing, shared by the great Michelle....

This is a great writing warm up or idea generating activity.  Using the stem "I wonder...", students generate a list of at least 20 statements that they wonder about. 

Here are some of my wonderings...

I wonder how many words I will read in my lifetime.
I wonder how Toby feels about Rosie.
I wonder if Lasik surgery would hurt (much).
I wonder how the birds know to wake up even before the sun comes up.
I wonder if my dogs understand me when I talk to them.

After generating a list of 20 statements, they cross out half of them to leave their ten favorites. 

Then the students have a writing choice (I love choice in writing!)-- they can either arrange all of their I wonder statements into an "I Wonder" poem, or chose one of their wonderings and write about it.

As I mentioned in previous posts, I have discovered that I love writing so I want to take this opportunity to share my wondering poem about how my older dog (Toby) feels about our newer dog (Rosie).

How Do You Feel?

You were probably perfectly happy until that day that we brought Rosie the Puggle into our family.
Dad would throw your tennis ball and you would chase it.
You would snuggle next to me on the floor and I would rub your belly.
As we ate dinner, you begged silently at my side, hoping for a treat from the table.
The kids would take you for a walk up the hill for a field trip away from home.

Life was good.

Then, one day, your life as an only-dog child ended.
Rosie arrived.

Now as you chase your tennis ball, she runs by your side, barking an obnoxious bark.
She snuggles on the sofa with me at night, a place where you are not allowed because of your shedding white hair.
You have to share the table scraps with her, as she sits on my other side begging too.
When it’s time for a field trip, she tags along…every time.

But I also wonder how your life has changed for the better.

You now have a companion who will help keep you young with her crazy antics.
You both play together, heads down, butts up in the air, as you taunt each other.
When we are not home, you have someone to keep you company so you don’t get lonely.
When it storms and the thunder scares you, Rosie can reassure you in dog language that it will all be OK.
Because she sometimes makes “bad Puggle choices”, you can watch as SHE gets yelled at.
 
Yes, life is good.

Because sometimes it takes the glass being half empty to realize that it was really half full.


I think I Wonder writing would be great to use at the beginning of a unit in science or social studies, to generate wonderings about a read aloud, or for general questions that the students are curious about.  It is similar to the "W" in a KWL, but takes inquiry to the next level as it adds the writing aspect.  We want to teach our students to be inquisitive and to learn how to ask questions, not just answer them, don't we?

The second thing I want to share today is a very cool activity for teaching VOICE in writing.  This activity came from Sara's inquiry project about teaching mini-lessons in the writing workshop. 

Voice is something that is so important to writing (it is one of the 6 Traits), but is difficult to explain, other than to say that voice is what makes your writing sound like you and not like someone else.

Here's an activity to make that concept more concrete.

Explain to your students that you will be asking them to put their heads down with their eyes closed.  Tell them that you are going to walk around the room and tap some of them on the shoulder.  If they get tapped, you want them all to say the same thing.  (Put a sentence on the board like "Fourth grade rocks!" or something simple like that.)

Walk around the room and slowly tap four or five kids and they say "Fourth grade rocks!"  Because everyone's eyes are closed, students are more tuned into their sense of hearing and can really hear each person say the sentence.

After four students have been tapped, have everyone share the difference in the way that each student said the sentence.  You will probably hear difference in expression, emphasis, accent, etc.  Explain to your students that while each student was saying the same thing, they all said it in their own unique way. 

Equate this to voice in writing.  We may all write about similar experiences or ideas, but our job as writers is to put our own unique "voice" to our writing.

Isn't that cool???

I hope that these two ideas are something you can use in your classroom!  Thanks for reading!

Monday, July 22, 2013

National Writing Project Day #11: Thought Museums & Writing Circles

 Hi Everyone!

I'm kind of bummed that I don't have anything to share for Monday Made It this week....it hasn't been a very good crafting week for me.  But I've got some new ideas floating around in my head for next week (now all I need is the TIME to get to them!  :)

Today at UW-Milwaukee Writing Project, I learned about two things I had absolutely no idea what they were before today. Kelly, one of our two presenters today, shared her inquiry project on Thought Museums & Writing Circles.

First, Thought Museums

The concept behind this is absolutely GENIUS and it would be so easy to do in your classroom!  The idea with Thought Museums is to get students thinking and writing all at the same time.

Take a poster board and in the middle of the poster board, tape a quote, picture, poem, etc. along with a simple direction such as "What does this poem make you think of?" or "What questions do you have when you look at this picture?".  It is helpful to have about three or four different boards so there is some variety.

Students then walk around with a pencil/pen and write their response on the poster board and sign their name by their comment.  But because this is a museum, it has to be absolutely silent.  After about 5 minutes, students return to their seat and you share thoughts, common observations, themes, etc. from the poster boards. 

Here are some pictures of our Thought Museum today:


As always, I like to reflect on ways this can be used in my classroom (and yours!):
 
  • As a preview activity in science where I post some pictures and main ideas and students respond
  • In math when I post a math question such as "How did you use math today?" and students respond
  • Posting quotations from a book we are reading and students share their connections
  • In character education when students respond to a prompt such as "What does respect look like?"
Really, the possibilities are endless!  I hope you will give Thought Museums a try!
 
Now on to Writing Circles...
 
You may be familiar with Literature Circles in reading class.  Well, Writing Circles are somewhat similar, but unique in their own way.
 
Writing Circles are used in the writing classroom about once a week to promote collaborative, supported writing activity for all students.
 
There several component to Writing Circles, but due to space and time, I will try to highlight what I learned here to give you the idea:
 
1.  Group:  Divide your students into groups of about 4-5 students.  Have each group come up with a name for their group (consider it to be something they all have in common, like my group was called "The Procrastinators" :)
2.  Brainstorm:  Each student is given three notecards.  On each notecard, each student writes 1-2 words of a very broad topic (pets, vacation, school, family, memories, sports, etc.). 
3.  Collect & Distribute:  One student collects all of the cards and shuffles them up.  He then deals three random cards to each person in the group.
4.  Discard:  Each student looks at their three cards, chooses one of the three that she would most like to write about and discards the other two.
5.  Rating:  Students then pass their ONE card to the person on their right.  This person looks at the topic and rates it by putting a small symbol in the top of the notecard.  They use these symbols to rate: 
          * = I would be excited to write about this topic
          + = I could write about this topic
          - = I am NOT interested in this topic AT ALL
Continue to pass the cards to the right and rate them until students get their original card back.
6.  Choose a Topic:  Based on the ratings, students choose the topic they will ALL write about.  It will probably be the topic with the most stars (*).
7.  Writing: Students take a designated amount of time (20 minutes?) to write about their topic.  Students each CHOOSE the genre they will write in, but the topic has to be the same for all group members.  For example, if the topic is "Travel," students could write a poem, a narrative, a vacation review, a newspaper article, an email, etc.
8.  Peer Feedback:  Students then come back together as a group.  They take turns reading their writing out loud to their group.  However, before reading, they tell their group members exactly what kind of feedback they would like.  This is very important as it really helps with the feedback process.  Here are some ideas:
          Connections you had
          Questions that popped in your head as I read my writing
          Does my word choice sound right?
          What did I do well?
          Suggestions for revision
9.  Future Use:  Students can then add this writing to their writer's notebook to use as a writing piece they will take through the entire writing process at a later time if they like it.
 
How do you assess the Writing Circle? 
- Student self reflection and/or group reflections
- Rubric
- Anecdotal record
- Finished product
 
Why use the Writing Circle?
- Promotes collaborative learning
- Teaches students how to seek and provide effective feedback
- Students are offered choice
- Students are in control of this writing time
- It generates new ideas & gets kids writing about topics they may not have chosen for themselves
 

There is an excellent resource available that goes into much more detail called Writing Circles by Jim Vopat.  I am excited to say that my friend, the UPS Man, will be delivering this gem to me very soon!  Can't wait to read it and then I can write more later!!


This is something I definitely want to share with my 4th grade team and the 5th grade because I am so excited about it.  I think it would be awesome if we could all get our students involved in Writing Circles.  (So Jamie, Mickey & Bridget, if you are reading, get ready!  :)
 
Have you ever used Writing Circles in your classroom?  How do you get students to work collaboratively on writing?  I'd love to hear from you!!
 
Until tomorrow!

Saturday, July 20, 2013

National Writing Project Days #9 & 10 -- Sticky Walls & E-Portfolios


It's hard to believe that my second week with the UW-Milwaukee Writing Project is over.  One more week left...  :(

This has been such an AMAZING experience!  I have learned so much about new ways to teach writing.  As an added bonus, I have also discovered how much I love to write!  We do tons of writing at UWM-WP, because as our fabulous leader, Karen, reminds us, "Teachers who write make the best teachers of writing!"

I hope you will look into getting involved with a Writing Project at a site near you!  You won't regret it!!
I want to share a neat trick I learned about at UWM-WP that we refer to as the "Sticky Wall."   Our co-leader, Jenny, introduced us to this fun idea.  (Her favorite color is orange, I just wanted to add .... : )
To make a sticky wall, take a piece of nylon from the fabric store (a vinyl tablecloth might work as well) and spray it with adhesive spray which you can purchase at a craft store like Michaels or Hobby Lobby.
 

And voila!  An instant place for students to place papers, notes, wonderings, questions, compliments and much more.


Why use a Sticky Wall instead of Post-Its?  I don't know about you, but Post-Its always end up fluttering to the floor in my classroom.  They just don't stick long enough for me, especially when hanging on a wall.

Now on to the presentation...

On Friday, Carrie presented her inquiry project on using e-portfolios for student writing.  She began with this cute (and totally hilarious!) commercial video:  (It's only 40 seconds long.  Give it a look!)

 So....are you an "Emma?"

I am!  Or at least, I partly am....

I'll admit, there are some things I still prefer to hold in my hand on a piece of paper.  There are other things I'm OK with being electronic.  For instance, I now prefer to read my books on my iPad (although I thought I NEVER would).  I also keep our family calendar electronically.  However, I also have file folders and file folders full of paper at school.....some of which I will never look at again.  How sad...

Storing student writing electronically is an awesome idea!   There are so many benefits to using e-portfolios with students:
  • It increases student motivation and engagement-- Students take ownership of their portfolio and decide what work goes in it.
  • The link between home and school is strengthened as parents can access their child's portfolio to stay involved.
  • They provide a forum for student goal-setting, self-assessment, and reflection.  E-portfolios can be used to show how students are meeting the standards and show growth.  They make progress more visible and are a great formative assessment tool.
  • They develop 21st Century skills and support lifelong learning.
  • My favorite reason.....E-portfolios support collaborative learning and an AUTHENTIC audience as students share their writing with others (and the world!) and provide feedback through commenting on other writing.

There are a few sites that Carrie shared that would be helpful in getting started and for learning more about e-portfolios.


I have used Kidblog in the past, but not to the extent of the possibilities that I learned about on Friday. 

If you want to learn more about using e-portfolios in your classroom, Carrie shared an awesome wiki put together by Kathy Cassidy with TONS of information about getting started and ideas for using e-portfolios:

I am ready to give e-portfolios a try and to give up a little bit of "Emma-ness."

How about you?  Do you use e-portfolios in your classroom?  If you do, please leave a comment and share your experiences with all of us!

Thanks, as always, for reading!